

by Fancy Free Diva
People always remark about how expensive a trip to Walt Disney World is, and people always seem to be looking for tips and tricks to save money. When we travel to WDW, we invariably see so many souvenirs that we’d like to take home with us, but the price tags on many of them keep us looking, but not touching. However, one of our favorite souvenirs, one that we purchase multiples of on every trip to WDW, is pretty inexpensive. Coming in at a modest fifty-one cents each is, you guessed it: the pressed penny!

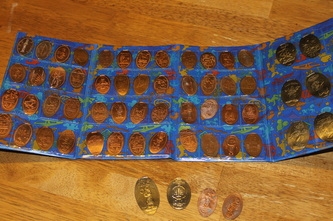
Some of our pressed pennies in a souvenir holder you can purchase at WDW (we did break down and buy one of those…)
On our last trip to WDW, we pressed a lot of pennies! It was so much fun to search out the penny machines as we journeyed throughout the parks, and our two children, even as little as they are (4 years old and 15 months old), loved pushing the light-up buttons on the machines to select the design for the penny. Our 4-yo even tried turning some of the cranks on the older style machines, but she found she needed some mommy or daddy muscle to help her out, most of the time.
We always have a great time collecting these inexpensive souvenirs, and, needless to say, we’re going to press even more pennies on our upcoming trip. For this trip, though, after some research online, we will have a much better (and cuter) system for keeping track of all our pennies as we go through our day. I mean, with the magic of the magic band, we rarely bring cash into the parks any more, and loose coins can be a hassle, even when you’re not at a Disney park. Here’s a solution that won’t leave you bogged down by heavy change or jingling from your pocket with every step.
It all starts with a couple of tubes of miniature m & m’s.

We press a lot of pennies, and we really enjoy m & m’s, so we prefer the larger tubes.
Diva Tip: If you’re the one reading this article, then you deserve to eat all of the m & m’s in the tube! Also, the plastic oval-shaped Mentos containers could also come in handy – they’re the perfect excuse to eat more candy, plus the oblong pennies will fit perfectly inside once you’ve pressed them!
I saw this idea for the m & m holder for your pennies and quarters for the first time in a Disney Diva Tip by the Savvy Diva, but there are many other variations available online. The first thing you have to do is eat all of the m&m’s from inside the tubes – the kids and I had a lot of fun with that! Then, you have to peel the wrapper off the tube. I measured the peeled off wrapper at 4.5″ x 5.5″ with a ruler. This measurement lets you know how large to set the image on your computer screen for printout.
Diva Tip: It helps to know exactly what size area you’re looking to print out, and most image editing programs (even the ones embedded in a word processing program like Microsoft Word, which is what I used) will allow you to set the exact image size to print out. That way, you won’t have to literally cut your image, and you can be sure that the image you choose will actually fit well into the area you have to work with.

The next step was to find some adorable Disney images online to decorate our tubes with. (Please note that I do not, in any way, own any of the images or characters depicted – I merely found them online.) I just used my word processing program to set the image size and insert a text box on top of the image so that I could add a label (in Waltograph Disney font) to the wrappers.
Diva Tip: Disney-themed scrapbook paper would also work well for this project!

One of the images I found online to use for our souvenir penny holder.
Next, I printed the images on sticker paper, cut out the images, stuck them on the tubes, and then covered the tubes with clear packing tape to protect the images (in case they got rained on, etc.).
Take a look:

The finished product.
Diva Tip: If you think this whole operation is a little to crafty or time consuming for you, take a trip to your local craft store and check out their selection of Disney-themed duct tape. You could duct tape around your m & m tube easily, and duct tape is waterproof, too!
The next step is to fill the tubes with pennies and quarters. A roll of each fit perfectly inside the larger sized m&m’s minis tubes. We alternated our coins to create a pattern. Since each pressed penny costs $0.51, we put 2 quarters and a penny together, then stacked them up. This was great practice in pattern recognition for my little ones!
Diva Tip: You can go to the bank to ask for rolls of brand new, super shiny pennies, or you can clean your own pennies with this fun science experiment: pour some vinegar into a bowl and add some salt (1 tsp salt for every 1/4 cup of vinegar). Stir it up. Add a few pennies. Wait a bit. You could try counting to 10. Take the pennies out, rinse them with water, and voila: shiny pennies!
Next, I searched online for some information about the penny presses, because while we are not going to try to “collect them all,” necessarily, we don’t really want to duplicate designs that we already have. Presscoins.com has a very complete website. Parkpennies.com also has a lot of information, with special sections for each of the Disney parks and properties. I especially liked the WDW coin press checklist they had for download.
Pressing pennies (and some quarters) has become somewhat of a tradition for us. I remember doing it on trips I took when I was younger, and I am happy to be able to share this tradition with my own children. The pressed pennies are also inexpensive souvenirs, and most major rides and special locations (like Splash Mountain or the Polynesian Resort) have their own unique designs. That means they are a great way to commemorate special experiences, or to include on scrapbook pages next to photos and memorabilia.
***Disclaimer – We at Tips from the Disney Divas and Devos hope you enjoy reading our articles, and encourage you to share any you feel may be of interest to someone else. We do ask, however, if you choose to share the photographs attached to our articles, you give credit to the photographer. Thank you for your cooperation and sharing our love of Disney!
***Parts of this article originally appeared on funfancyfree.weebly.com.


