by Disney Magic Diva
 Whether at Walt Disney World Resort, Disneyland Resort, a Disney Cruise or any Disney Park across the globe, meeting characters while on your vacation is one of the highlights for many people. Young children and the young-at-heart revel in the chance to say finally interact face to face with the beloved characters we all know. And while saying hello and snapping that precious photo, it’s also fun to get an autograph so you have a keepsake of that magical moment. A Disney autograph quilt lets you get a hug every day from your favorite characters even after you return home!
When our oldest granddaughter had her first trip years ago, we wanted to do something a little different to collect autographs. So, we decided to make a Disney autograph quilt. It’s been about 10 years, and she still loves cuddling up with it on the couch, and even on the plane traveling to Disney. Since then, the younger two grandkids have collected signatures for their Disney autograph quilts too. They have fun getting out their quilts and comparing who has which character every time it’s Disney Family Movie Night at home!
Making a Disney autograph quilt doesn’t have to be as complicated as it may sound. If you have a beginner’s level of sewing ability (i.e., a sewing machine and able to sew a straight line) you can do this! Here’s how we made ours: (For other great autograph keepsake ideas, be sure to check out our tips for character encyclopedias, pillows, stacking blocks, DIY autograph books by Character Diva and Pink Diva and more ideas for a Disney autograph quilt!)
Choose Fabric
Everyone knows waiting for your Disney trip can be both hard and exciting. One of the ways we helped the days go by is by prepping for the quilt. We gave a lot of thought to how we wanted the quilt to look, and whether we wanted to incorporate a theme. In the end, we kept it pretty classic, using traditional Disney colors and simple fabrics.
You’ll want to choose a light-colored (we used white) fabric for the actual autograph squares. The other fabrics are entirely up to your personal preference. We chose one fabric for the back of the quilt and another coordinating fabric to fill in between the squares on the front. You can certainly choose as many as you like to incorporate in your Disney autograph quilt!
A simple cotton blend fabric has worked well for us. When choosing the fabric for the autographs, try to find something that isn’t too thin. A slightly heavier weight fabric will be much easier for the characters to sign.
How much fabric to purchase depends on the size of the Disney autograph quilt you want to make. We usually keep it to a finished size of around 4’ x 5’ – plenty big for a child to cuddle with, and not too big to make it a problem sewing. The best way to figure out how much fabric you need is to sketch it out (graph paper is fabulous for this!). Think about any sashing (the accent fabric between squares) and the border you may want. Also, remember to include seam allowances for each piece.
Prepare the Fabric

Materials to prep your fabric squares
First, you’ll want to wash and dry the fabric before you cut it, just to be certain there aren’t shrinkage problems later. You’ll likely want to press it, too, so you have a nice, smooth surface.
At this point, you can set aside your coordinating fabrics until you return from your trip and are ready to put the quilt together.
You will, though, need to prep the fabric you’re using for the autographs. Refer to your sketch to see how big the finished square will be (ours is usually about 6-7” square).
Diva Tip: Cut the autograph squares at least 2-3” bigger than the planned finish square size. This gives you plenty of room for seam allowances and trim the square once the character has signed.
Once you have the autograph squares cut, iron freezer paper on the back. This will give the fabric “structure” and keep it from wrinkling up when the characters try to sign it. Just use a warm iron, and the paper should adhere easily.
Then, I’d recommend taping off the section of the square where you want the character to sign. Painters tape works wonderfully! We found this helps the characters stay in the middle of the square. Even if they happened to sign a little off-center, you can adjust the square by trimming it up when you get home so the autograph is in the center.

Tape around the edges of the square, so characters sign in the middle
Finally, tape the edges of the fabric square. This will help the freezer paper stay attached, and keep the edges from fraying. Your prepped square will look a little odd, but we’ve found it works great! And, besides, when you hand characters something unique to sign, it inevitably strikes up a wonderful conversation with them!
Assemble the Autograph Bag
After your squares are prepped, you’ll want to assemble an autograph bag. Ours was very basic. We wanted a way to keep the fabric squares clean and dry, so we just placed them in a gallon Ziploc bag. We also included a few sharpies but placed those in a smaller Ziploc bag inside the gallon-sized bag to prevent any accidental marks on the fabric. Finally, we included a memo sized (about 6”x 9”) clipboard. It worked perfectly to hold the fabric square while the characters signed, and it gave them something solid on which to write.
Getting Autographs
The most fun part is collecting all your favorite characters’ autographs! We usually bring just a few squares with us each day. Check your itinerary for the day, and estimate how many you’ll need. Be sure to bring a few extra in case you see an unexpected character! Leave the completed ones in your resort room. They’ll be safer and your park bag won’t be so heavy!
As your turn to meet the character approaches, get a square out of your bag and fasten it to the clipboard. If meeting multiple characters in a single setting, get enough squares out, but it works best to only attach one at a time to the clipboard.
Making your quilt
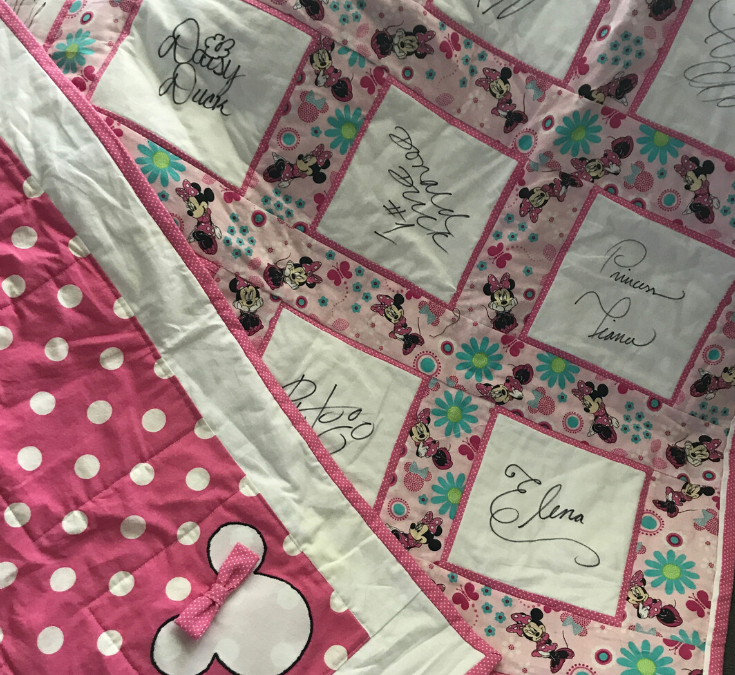
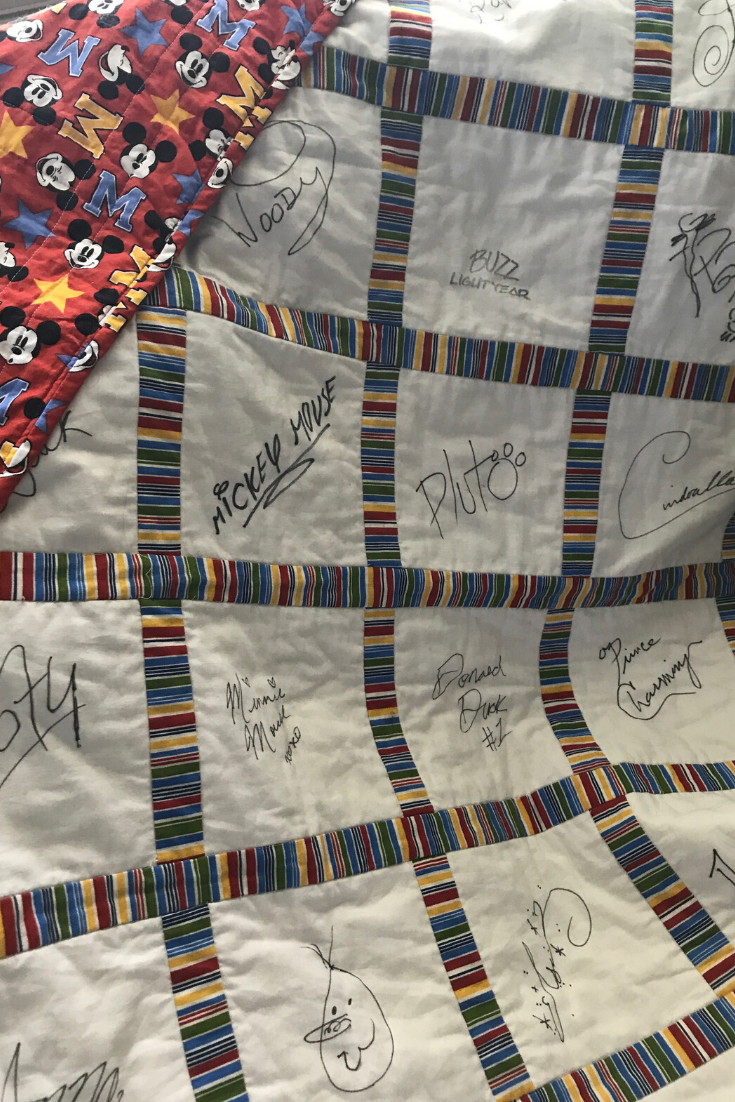
The best part about an autograph quilt is even though the trip is over, the magic doesn’t have to end! When you get home, lay out the squares and decide where you want each autograph placed. All princesses together? Placed in the order you visited? Sensational Six in the middle? You decide!
 Take off all the tape and trim the squares to the size you want. Be sure to add in seam allowances when you cut! Another important tip is to make sure your squares are really square! Using a rotary cutter will help immensely with this.
Cut your sashings (again, adding in seam allowances and making sure the cuts are straight!) Begin sewing the sashings to the autograph squares. Then add any borders you want. When the top is finished, trim it up so the top is the same width as the bottom, and both the left and sides are the same lengths.
Now you’re ready to add the batting and back to the quilt. You may decide to add a binding to finish off the edges. It’s your quilt – do what you like!
Once the front is attached to the back, you’ll want to “quilt” your blanket. This can be simple, too. You can just “tie” it together by tying short pieces of ribbon or yarn through corners of the squares. Or you can “stitch in the ditch.” This means you just stitch along the seams. So, for instance, you could stitch around each autograph square. Doing this will have the effect of each autograph square “popping” out and making it more prominent. And you don’t need to worry about careful stitching – just stitch in the ditch of the seam and it’s practically hidden!
You may also want to add a name and or date to your quilt. We like to do this so we remember the year of the visit. You can make a label and attach it to the quilt, or just embroider directly on the fabric. We were able to run a piece of fabric through our printer, and have names and dates printed directly on the fabric! Give it a try!
As I said, our grandkids love their autograph quilts. Each is unique and customized to their personality. It really isn’t too hard to make, and it’s a fun souvenir from their trip.
Are you planning a trip to Disney? What’s your favorite way to collect autographs? We’d love to hear about it! Leave us a comment (bonus points for photos!)
And if you need some help in your Disney planning, be sure to contact Patricia at All for Dreams Travel. She can do as much or as little of the planning as you like – and it’s all FREE!
***Disclaimer – We at Tips from the Disney Divas and Devos hope you enjoy reading our articles and encourage you to share any you feel may be of interest to someone else. We do ask, however, if you choose to share the photographs attached to our articles, you give credit to the photographer. Thank you for your cooperation and for sharing our love of Disney!


